Creating an Xmipp Release (Deprecated on v4)
Step 1: Define the Version Name
The version name follows the format X.YY.ZZ.B for the binaries (xmipp, xmippCore and xmippViz) and X.YY.ZZ.P for the plugin:
X: 3 This keeps the main version number consistent to sort releases and maintain xmipp3.
YY: Year of the release.
ZZ: Month of the release.
B: Binaries version. Each release starts by 0. If any hotfix is required in any repository (Xmipp, XmippXore, or XmippViz), it has to be increased by +1 in all three repositories.
P: Plugin version. Each release starts by 0. If any hotfix is required, it has to be increased by +1. No changes in other repositories are required.
Example: 3.24.12.0.0 - Poseidon (for a December 2024 release). Additionally, name the release after a Greek god or goddess. Check out the list
Note
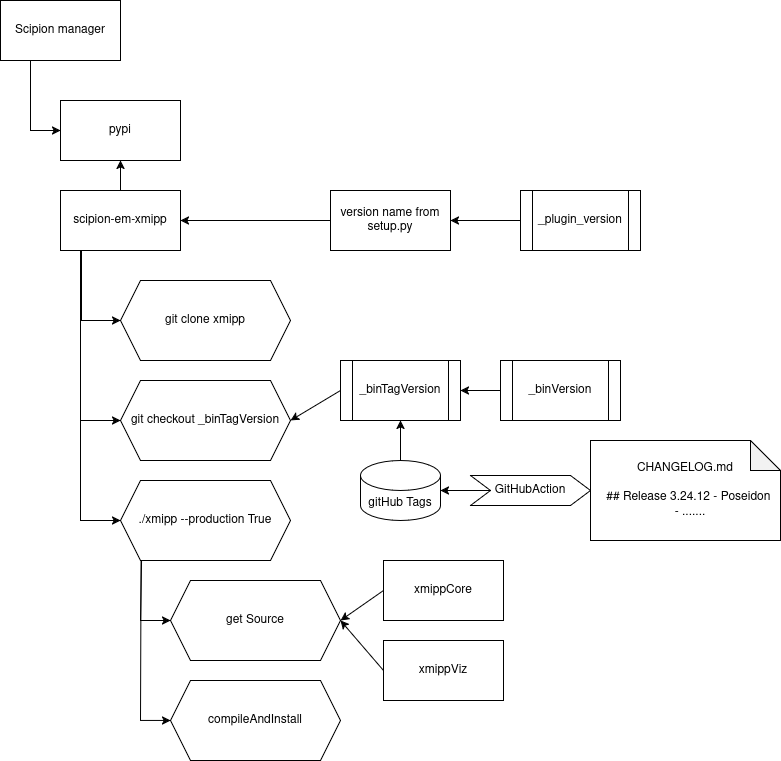
The Scipion plugin manager takes the pypi package from here. This package is created in a Github action that takes the __version__ from the setup.py file (in future from the .toml file.) The producction installation procedure takes the version._pluginTagVersion variable and checkout to that tag generated in an action of GitHub. After that clone the rest of repositorioes and checkout to the version._binTagVersion generated in a GitHub Action.
Step 2: Update the CHANGELOG.md
Go through the changes in CHANGELOG.md file: - xmipp (includes xmippcore). - scipion-em-xmipp. - xmippViz.
Follow the tittle format used in previous releases. - This is crucial because the release automation uses these tags.
Use pull requests as a reference to identify changes and describe them clearly.
Step 3: Schedule the Release
Announce at least two weeks in advance that no new changes will be merged into devel. This stabilization period helps identify potential bugs in the devel branch.
Prepare all steps in advance.
Post the release at the start of your workday to address any issues promptly.
Step 4: Check Tests
Verify that most tests pass, or at least confirm that failing tests are consistent with previous results.
Use tools like Buildbot and Hertz-Cinco for validation.
Step 5: Update Protocol Status
Review the _devStatus of each protocol: - Set to PROD, NEW, or UPDATED if applicable.
Consider deprecating protocols no longer in use or supported.
Step 6: Create Candidate Branches
Name the release branches according to the release version (e.g., release-3.24.06).
Step 7: Update Version Information
In Xmipp:
In scipion-em-xmipp:
Change the devel variable to release in here
Update _current_xmipp_tag (pay attemption the name convention, the tag is generated by the release action and looks lie this: ‘v3.24.12-Poseidon) and _currentBinVersion accordingly.
Step 8: Validate Release Branches Locally
Note
The PR of the release from the Xmipp repository has to be merged in order to have the tag available
a. Simulate localy
Check out the release branches locally or on a test machine.
Verify: - Installation with Scipion. Downolad the scipion-em-xmipp repo in the release branch.
git clone git@github.com:I2PC/scipion-em-xmipp.git --branch release-3...
cd scipion-em-xmipp
In your local, change to False develMode . After that, install xmipp and inspect any posible issue
scipion3 installp -p . --devel
scipion3 inspect xmipp3
Open the scipion gui and execute a few tests.
b. Simulate using the plugin manager:
Install scipion with the last (the one before the current release) xmipp
Create a `plugins.json` file:
Use a structure similar to the one at https://scipion.i2pc.es/getplugins/, but replace the scipion-em-xmipp entry with the following:
{
  "scipion-em-xmipp": {
      "pipName": "scipion-em-xmipp",
      "pluginSourceUrl": "https://github.com/i2pc/scipion-em-xmipp.git@release-3.24.12a",
      "id": 2,
      "name": "Xmipp3"
  }
}
Update `scipion.conf`:
Add the following line to your scipion.conf file (adjust the path as needed):
SCIPION_PLUGIN_JSON = /home/userName/scipion/config/plugins.json
Install scipion-em-xmipp from the terminal with
scipion3 installp scipion-em-xmippNote
The plugin manager will fetch the repository from GitHub with the specified branch (indicated after @).
This setup allows you to simulate an update.
Ignore the version number, as it may not be properly displayed in this configuration.
Step 9: Create Pull Requests
Open four pull requests: - Release to master for each relevant repository.
Step 10: Document Changes
Compile a list of changed files, lines added, and other details from the PRs. Document this in the Xmipp monitoring file.
Step 11: Merge the Pull Requests
Merge the four PRs. - This triggers the creation of release tags on GitHub. - In scipion-em-xmipp, it will also upload the package to PyPI. Note: This is the most critical step to revert if issues arise.
Step 12: Announce the Release
Share the release news via: - Email lists. - Discord. - Any other relevant platforms.
Step 13: Consider XmippTomo
Evaluate whether XmippTomo needs a corresponding release.
Step 14: PR from Release to Devel
Create a pull request from master back to devel.
Revert the tags for release and devel in scipion-em-xmipp
—
That’s it! Now sit back, grab a coffee, and enjoy your shiny new release. 🚀
Note: Scheme installation and versions name
